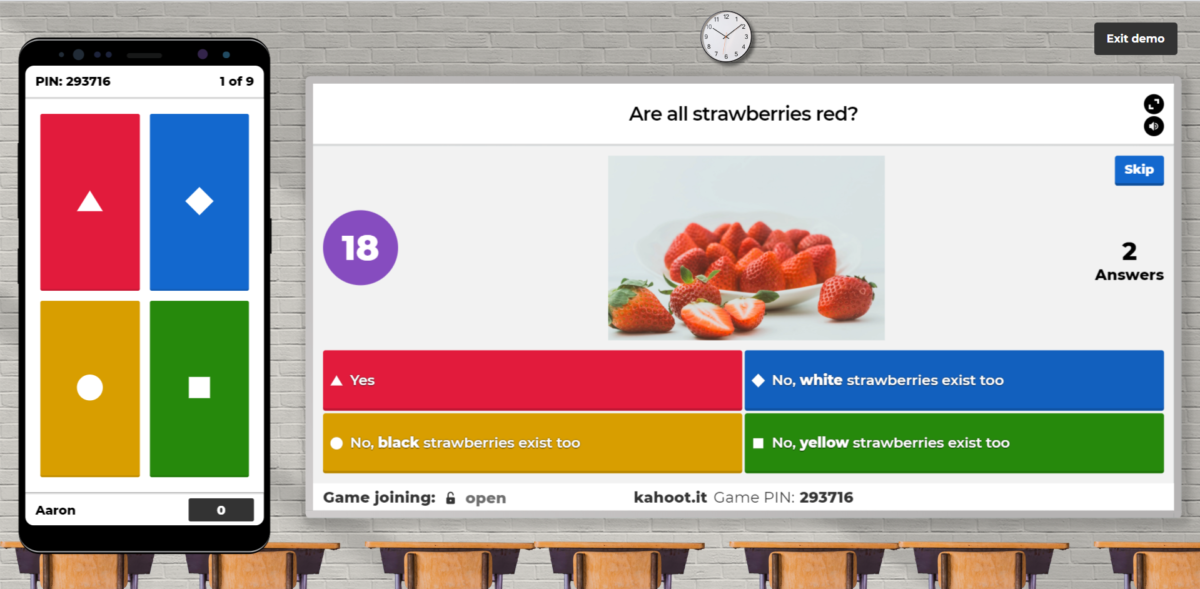
Using Kahoot in the Classroom

Kahoot is an interesting app and website that allows one user to create a series of questions to ask a group of people who compete to answer them correctly and speedily. Scores are determined according to whoever answers correctly first (points are allocated in decreasing amounts to second place, third place, and so on).

Uses for the Classroom

  • Competitive Quizzes / Games
  • Informal skills / knowledge tests & assessments (Reports)

Recommendation: Although the Kahoot App also makes it possible to create and edit Kahoots, I remember doing MOST tasks on the computer because it is slightly easier to find everything (the screen is larger), and you will likely be hosting your Kahoots from the computer. So it is a good idea to familiarize yourself with the website first.

Step 1: Sign up / in

  1. Visit kahoot.com
  2. Click “Sign up” in the upper-right hand corner
  3. Select your Account type (Teacher)
  4. Select your Workplace (School)
  5. Create account ***
  6. Select your Edition (Free)
  7. Provide additional info (optional)
  8. Explore the Dashboard (Get Started)
    1. See how it works
    2. Create kahoot
    3. Host kahoot

*** Important note about “Create account”

In the Create Account screen, you have THREE options:

  1. Email / password
  2. Sign up with Google
  3. Sign up with Microsoft

Whichever option you choose to sign up with MUST be used to sign in later (and they do not overlap each other). For example:

  • if you sign up with Google, you CANNOT use Email / Password to sign in later
  • if you sign up with Google, you MUST use Google to sign in later

Why “Google” and “Email / password” are not the same

The reason for this is because of the authentication (sign in) method used by the website.

  1. Email / password will remember both your email AND your password
    • (The password is actually passed through a hashing algorithm in order to scramble it so it can’t be intercepted by another user. The scrambled password is matched with the scrambled password stored in the database for your user ID, and if the two scrambled passwords match, your identity is confirmed and you are logged in. So, in this case, Kahoot stores BOTH your email AND scrambled password in their database.)
  2. Google and Microsoft Sign In log you in with an authentication TOKEN
    • (A separate window opens where you log in to your Google or Microsoft account separately. Once you authenticate (login) with Google or Microsoft, your email service sends a unique authentication TOKEN to Kahoot in order to confirm your identity. So, in this case, Kahoot does NOT store your password at all, but rather relies on the TOKEN provided by Google or Microsoft to log you in.)

That is why the two sign in methods are not compatible (interchangeable).

  1. Email / password = uses your email / password (and remembers both)
  2. Google / Microsoft = uses a TOKEN (and remembers only your email)

Step 2: Create / find a Kahoot

You may wish to investigate Kahoots that have already been created first to get an idea for the kinds of things that are possible. Click “Discover” in the top menu to do so. Later, you may wish to “Create” your own (top-left button).

  1. “Discover” Kahoots (top menu button)
    1. Search for a Kahoot that looks interesting
    2. Select it to view the questions
    3. Some Kahoots you may be able to Edit, or add to your own Library. Others you may only be able to Favorite and Play with your class
  2. “Create” your own Kahoot (top-right button)
    1. Create a New Kahoot or use a Template
    2. You can modify an existing Template
    3. Or, if you are creating a New Kahoot, type your own questions and answers
    4. Question Types:
      1. Quiz (4 choices)
      2. True / False (2 choices)
      3. Typing (premium)
      4. Puzzle (premium)
      5. Poll (premium)
      6. Slide (premium)
  3. After creating a Kahoot (or using a Template), find it in your Library of Kahoots under the “Kahoots” button in the top menu

Step 3: Host your Kahoot

To host / play your Kahoot:

  1. View your Kahoots Library
  2. Click “Play” on the Kahoot you want to host
  3. Click “Teach” to play it in class
  4. Select “Classic” in Game options (you may also want to change or disable the Lobby music toward the bottom of the screen)
  5. When you Start the game
    1. The screen on the right will appear on your projector / computer
    2. Students should go to kahoot.it to enter the Game PIN on their devices
    3. Students can choose a Nickname (caution: some students may try to choose joking or rude nicknames)
    4. Once all students have entered the Game PIN and a nickname, Start the Game
  6. Questions will be shown on screen with a timer
  7. Students select the correct answer from the group of symbols on their device
  8. After all students have answered (or time is up) the correct answer will be shown on screen
  9. Finally, a leaderboard will be shown and tally up each player’s points

Step 4: Kahoot Reports

You will also be able to see a detailed analysis of the results of a played Kahoot in the “Reports” tab.

  1. Click “Reports” in the top menu
  2. Select the Kahoot you want to view reports for
  3. Detailed analysis includes:
    • Correct %
    • Difficult questions
    • Students who need help
    • Students who didn’t finish

I hope that gives you a good overview of using Kahoot in your classrooms. There is much to explore, so just take some time to familiarize yourself with the program.

  1. I recommend getting familiar with the website FIRST
  2. And then going back in to the app to learn it

Once you know what is available in Kahoot through the website, it’ll be a lot easier to find it in the app.

Good luck!~

11 Great Google Services (for your classroom)

I want to briefly introduce you to 11 powerful Google Services that can have a big impact on your teaching. These are things that I personally use nearly everyday. I’ll start with the most commonly used and easiest-to-learn tools, and progressively take us through more difficult or less commonly used tools.

View Slides →


Self Introduction

  • Google Certified Educator & Trainer (Feb. 2017)
  • G Suite Admin @ GPA HS (Certified Feb. 2017)
  • Computer Science & Graphic Design Teacher @ GPA HS (Feb. 2013)
  • ESL Teacher (Jeonju University Mar. 2010, Korea July 2006)
  • WordPress & web designer/developer (2010)
  • Freelance Graphic designer (MFA Apr. 2011)

Overview

I want to briefly introduce you to 11 powerful Google Services that can have a big impact on your teaching. These are things that I personally use nearly everyday. I’ll start with the most commonly used and easiest-to-learn tools, and progressively take us through more difficult or less commonly used tools.

  • Easiest (Search, Gmail, Translate)
  • Normal (Drive, Docs, Slides)
  • Harder (Forms, Drawings, Classroom)
  • Expert (Photos, Sheets)

Please, join my Class:

Class code: qa3d0gu


Easiest

#1 Search

The most ubiquitous Google Service is also the most powerful, and the most under-utilized Google service. Here are some tips to get the most of it. I’ve also linked to Google’s full Tips & Tricks page below.

Find stuff for class:

Use in class:

All Google Search Tricks →

#2 Gmail

Personally, the greatest 2 tricks to using Gmail are:

25 Gmail Keyboard Shortcuts that save me 60 hours per year →

#3 Translate

I know many people don’t think Google Translate is a really efficient tool, but there have been some really great updates to it recently that make it a much better tool.

  • Handwriting
  • Audio input (speak in English, HEAR and SEE the Korean response)
  • Camera input (for signs, etc)
  • Tap to Translate is the BEST thing I’ve recently discovered – it allows me to use Translate within ANY app, without switching
  • Translate dictionaries are also available OFFLINE

Tap to Translate video


Normal

#4 Drive

Drive acts like a hard drive in the cloud, but has some pretty unique features that you may not know about.

  • Sharing & simultaneous collaborative editing
  • Preview files you don’t have programs for (.AI, .PSD)
  • Review Drive activity ( Info)
  • Review File Revision history
  • Add-Ons (DriveTunes)

#5 Docs

Google Docs acts as an online Word document editor – but it has some unique features that are only available through a cloud service like this.

#6 Slides

One of the most powerful features in Google Slides is the ability to crop and edit images directly within the Slides window itself.

  • Templates & Master Slides View > Master
  • Image manipulation
    • Crop into shapes Format > Crop image
    • Recolor Format > Format options

I’ve previously created a complex PPT using the cropping images feature. I’ve included a link to this PPT below.

I’ve also linked to some really great Slides Templates and an alternate to PPT (slides.com) – that this presentation is based on.


Harder

#7 Forms

Google Forms allows you to create self-grading assignments and quizzes.

I’ve personally used Forms for Homework, surveys, quizzes, and chapter tests. It allows you to specify

  • Multiple Choice answers
  • Checkbox answers
  • Dropdown answers
  • Short answers

And if you need more flexibility and grading features, check out Flubaroo as a Google Sheets Add-on which can also analyze your student data and help you to see which questions were the most troublesome for a class.

#8 Drawings

Google Drawings allows you to create complex vector shapes (like logos). They can even be embedded into Docs.

But one of the most useful features I recently discovered was the “yellow handle” (shaped like a diamond) on some shapes that allows you to change its dimensions. I was able to recreate the KOTESOL logo in Google Drawings using this feature:

#9 Classroom

I’ve previously presented on Google Classroom at the KOTESOL 2017 International Conference. One exciting new feature that I’ve discovered since then is that it’s now possible (since January 2017) to assign work to INDIVIDUAL students as well as the whole class. This allows me to personalize assignments for students.


Expert

#10 Photos

Google claims you can have UNLIMITED storage of photos and videos on their service – at a reduced quality (their uploader converts it automatically) – I haven’t run out of space yet.

You can also create Shared albums that people with the link can “Add” themselves to and add their own photos. This is great for schools, families, and groups that want to easily encourage participants to upload and share their individual photos.

Read more about this on the article Google Photos adds smarter sharing, suggestions and shared libraries.

  • Unlimited storage with file reduction
  • Share album to allow uploaders

#11 Sheets

Sheets is a VERY powerful program once you start getting beneath the surface of things. It includes at least TWO useful features I’ll introduce here: Data Validation and Pivot Tables.

I’ve previously presented at the JNJ KOTESOL 2012 Conference about this topic – to create a Gradebook that only accepts certain values.


BONUS!

You can get Google Certified too!

There are two levels of Google Educator, tests are $10 each (online, and require a web cam).


Review & Resources

This is a list of ALL the resources I gathered for this talk.

  1. Search
    1. ALL Search Tips & Tricks – Inside Search
  2. Gmail
    1. Keyboard Shortcuts
    2. The 25 Gmail Keyboard shortcuts that save me 60 hours per year
    3. Gmail Guide: Inbox Management and Labels
  3. Translate
    1. Translate
    2. Camera Input example: La Bamba
    3. YouTube: Introducing Tap to Translate
  4. Drive
    1. View activity & file versions
    2. DriveTunes Add-On
  5. Docs
    1. Docs Template Gallery
    2. Google Fonts
    3. Version History
    4. How to Add Stock Photos to Google Docs
  6. Slides
    1. Slides Template Gallery
    2. SlidesCarnival.com (Copy additional, stylish Slides Templates)
    3. Slides.com – Make Better Presentations
    4. KOTESOL slides: Become a Better Presenter
    5. How to crop & edit images
    6. Editing Master Slides
  7. Forms
    1. Forms Template Gallery
    2. Flubaroo Video (better auto-grading of Forms)
    3. Flubaroo Sheets Add-on Link
    4. Example of my Google Site with Quizzes
    5. Create & grade quizzes with Google Forms
  8. Drawings
    1. 8 Creative Uses of Google Drawings
    2. Google Drawings for Graphic Organizers – Link
    3. KOTESOL Logo in Google Drawings
    4. Google Drawings: Semicircle
    5. Google Drawings on YouTube
  9. Classroom
    1. Using Google Classroom (5 page) – Link
    2. Google Classroom Manual (15 page) – Link
    3. Aaron.kr: Google Classroom 101 Talk
    4. Google Classroom updated
    5. Digital Differentiation with Google Classroom
    6. Individual Assignments & Small Group Work
  10. Photos
    1. YouTube: Introducing Shared Albums
    2. Google Photos About
    3. Shared memories made easy with Google Photos
    4. Google Photos adds smarter sharing, suggestions and shared libraries
  11. Sheets
    1. Sheets Template Gallery
    2. Data validation in Google Sheets
    3. Get Organized with 2 Google Spreadsheet Features
    4. My KOTESOL Gradebook Presentation
    5. How to Create a Pivot Table in Google Sheets
    6. Google Sheets Pivot Table Tutorial
    7. Pivot Tables in Google Sheets (Ultimate Guide)
    8. Tutorial: How to make pivot tables in Google Sheets
  12. BONUS! Get Google Certified
    1. G Suite Training – Chrome Web Store
    2. G Suite Training
    3. Training Center: Certification
  13. Other Resources
    1. Naver Office

Thank You!

Technology Upgrade: Build a Customized Grade Book

Practically, enhanced teaching begins when teachers themselves are comfortable using technology and applying it to real-world problems. Before there can be a “technology upgrade” in the classroom, teachers must understand the benefits and uses of a particular piece of technology so they can share those with their students. And what better place for teachers to begin getting comfortable with technology than with their own personal productivity?

Technology in schools is no “passing fad.” But neither is every new tech initiative a “silver bullet” to solve every problem faced by teachers and students. Too often, technology and related skills are either taken for granted or overlooked. Schools invest money in technology and expect teachers to use it to educate and empower 21st century students. But before we can have empowered students, a solid foundation must be built on reliable infrastructure, effective administration, extensive resources, and enhanced teaching.

The first half of this presentation will focus on the first three points:

  1. Reliable infrastructure
  2. Effective administration
  3. Extensive resources

The second half will focus primarily on enhanced teaching.

Practically, enhanced teaching begins when teachers themselves are comfortable using technology and applying it to real-world problems. Before there can be a “technology upgrade” in the classroom, teachers must understand the benefits and uses of a particular piece of technology so they can share those with their students. And what better place for teachers to begin getting comfortable with technology than with their own personal productivity?

Therefore, the conclusion of this presentation will give suggestions for enhanced personal productivity as well as lay out the basic steps for the creation of a very versatile class grade book in Microsoft Excel.

KOTESOL Grade book Presentation Notes

Chameleons and camouflage: Do you stand out? Or do you blend in (and hide)?

My self intro: I’ve taught 6 years in Korea, 3 at Avalon Academy, 3 at Jeonju University. I have a BS in Computer Science and MFA in Media Design – earned completely online. I’ve taught Teacher Training classes in Technology at JJU for 2 semesters, summer 2011 and spring 2012 (now).

I’ve worked with educational websites throughout my entire career, including Avalon’s online writing and speaking platform, the MOODLE CMS for my own JJU classes, and my own experience taking a year of online class for my Master’s degree from Full Sail University in Florida. So, I have a pretty good idea what good teaching with technology looks like.

Additionally, when I teach about making grade books in Excel, it consistently is ranked as the best and most popular skill I teach other teachers. So, I’ll talk about that in this presentation.

The book I’m currently teaching is “The Classroom Teacher’s Technology Survival Guide” by Doug Johnson, an English teacher, librarian, and district technology manager in his state in the US. It’s a great book, and many of my ideas have come from it.

Part One

Let me start with an observation – Technology Revolution. It’s revolutionized every field in the world…except maybe, education. In fact, ONLY education has not changed so much that a teacher from 1900 would not know what to do in today’s classrooms.

And when it comes to tech changes, we are creatures of habit – we like the old stuff even if its outdated. For example, new interfaces from Gmail and Facebook (Timeline) and the tons of resistance those received from (some) users. Sir Ken Robinson in a TED talk mentioned kids and wristwatches.

For kids under the age of 20, they see no need to wear a wristwatch, because technology tells the time all around them. But for the older generation (teachers), most of us wear wristwatches because we are creatures of habit, and its how we grew up. For our generation, a wristwatch was the best (only?) way to tell time, and even though it isn’t the most effective means of telling time nowadays, we still wear them.

Tech in schools is no “passing fad.” Neither is tech in schools a “silver bullet” (to solve every single problem with a single technology – though many administrators may come back from conferences with that kind of notion).

So then, WHY do we want tech in schools?

Automate/Informate

Tech in general really has 2 main functions:

  1. Automate – take standard operations and make them faster, more accurate, and less labor intensive.
  2. Informate (coined by Shoshana Zuboff in her book “In the Age of the Smart Machine” (1988)) – translating descriptions and measurements of activities, events, and objects into information.

The real power is in “informate.”

Examples:

  • Grade book: Automate (calculate grades), Informate (make available to students, inform teachers of trends, inform parents)
  • Website tutorials: Automate (lessons), Informate (learn new skills at my own pace)
  • Student Devices: Automate (homework), Informate (learn from anywhere)

So how can we go from 1906 to 2012? “Attitude is everything.”

Look at the “Survival Skills for your Own Tech Use.” We’ll look at #5 in the following section.

Hierarchies

  • Maslow’s Hierarchy of Needs
  • Johnson’s Hierarchy of Educational Technology Needs
  • Johnson’s Hierarchy of Student Technology Use

We will look at “Personally Productive, Enhanced Teaching” with the grade book.

Part 2

There are probably 3 kinds of (Excel) people watching my talk today:

  1. Those who don’t really know Excel (a blank spreadsheet)
  2. Those who know the basics (a basic grade book)
  3. Power-users (like me) who want advanced techniques

This look at Excel with be fairly basic, but even Power-users can benefit from some of the specialization I will talk about, AND the fact that we are all forgetful. This will be a good reminder to those who already know how, and a good beginning for those who wish to learn more.

Creating the Grade book

The grade book has spaces for:

  1. Student names and numbers
  2. Test and Assignment grades
  3. Participation and Attendance grades
  4. Final grade percentages
  5. Final letter grades
  6. A schedule of classes and topics
  7. A place for Bonus Points
  8. A place for calculating a grading curve

The grade book needs to have the following requirements met:

  1. Use the =SUM(...) function
  2. Use the =IF(...) function
  3. Use 2 more functions of your choice:
    VLOOKUP, AVERAGE, COUNTIF, SUMIF,
    MAX, MIN, SMALL
  4. Fill out the info (including grades) for 10 students
  5. Make it “pretty” with good formatting and design

Example Gradebooks

  1. Simple Elementary Grade book
  2. Aaron’s Grade book Example

Example formulas:

=RANK(A1, A$1:A$10, 0)
Means RANK(“what student?”, “Whole class”, Descending order)

=IF(A1>=0.9, “A”, IF(A1>=0.8, “B”, IF(A1>=0.7, “C”, IF(A1>=0.6, “D”, “F”))))
Please remember to change the CELL numbers.

Hints:

  • FIX the view: 보기 – 틀고정
  • Data Validation: 데이터 유효성

Some notes:

  • ISBLANK(CELL) only works on cells that are truly blank (no formula)
  • Need to be sure that “Automatic Calculations” (not Manual) is selected in the Excel Options.
  • Do you want to use points or percentages?
  • You CAN find out how many Absences they have using COUNTIF – but that only works on a continuous range of cells, not multiple selections
  • You CAN assign an “F/A” grade if the student has 9 or more absences – but that must be the FIRST argument in the cell.
  • Need to use the test “>=” to test grades, if using only “>” (for example, > 90) then it will evaluate wrongly. 90 would be “B” but “91” would be “A”
  • Therefore, separating Attendance and Participation VERTICALLY, rather than horizontally would probably work better.

Resources