This is a talk I presented at the Jeonju-Jeonbuk KOTESOL Chapter meeting for March 2015.
*Audience Note
I may have addressed this talk (and presented it) to a slightly wrong audience at the time. The meeting was small and contained people who are primarily ESL teachers – who may be familiar with certain web technologies.
However, I designed this talk for an audience who already understand the basic concepts of an LMS (Learning Management System) and want to implement it themselves in their classrooms.
Therefore, this talk is primarily an argument for WHY WordPress is the BEST solution for an LMS – as opposed to other possible solutions (including Moodle) – and introduces some basic concepts about how to put WordPress to work for you as an LMS.
WordPress as LMS
define:LMS/
Learning Management System: A digital learning environment to manage all aspects of the learning process.
In this talk, I will present THREE basic ideas about WordPress as LMS:
- WHY? (2 parts)
- Why an LMS?
- Why WordPress?
- HOW? (2 parts)
- How does an LMS work and how can we use it?
- How can we use WordPress to create an LMS?
- WHAT?
- What are the specific steps we can take to create an LMS in WordPress?
Step 1A: Why an LMS?
Recall again that an LMS is “a digital learning environment to manage all aspects of the learning process.” The following is a list of 6 basic aspects in the learning process:

- Communicate objects (syllabus, course objectives, handouts, etc)
- Learning timelines (class schedule)
- Delivery of materials (drip content)
- Assessment & Tracking of student data
- Communication with students
- Ongoing Resources
Traditional classrooms usually involve a great deal of printed paperwork and in-class interaction with the teacher.
On the other hand, LMS-assisted classrooms may help reduce (or entirely eliminate) papers and increase student-to-student interaction both in and out of class.
Another reason LMS-assisted classrooms are beneficial for teachers:
No more lost USBs.
I personally haven’t carried a USB in 3-4 years because I store all my lessons, PPTs, documents, and resources on my classroom website (or in Google Docs which can be used in collaboration with my website). Besides that, simply by relying on a USB stick, you are risking spreading viruses between unprotected PCs or even absentmindedly leaving it behind after class.
Are you smarter than a College Freshman?
And another reason to start looking into setting up an LMS is because high-schoolers these days are learning this kind of technology themselves as graduation requirements.
In a document (created in 2006) I downloaded from the San Diego Unified School District that outlines High School Technology Compentencies, the following are the THREE level of Web Authoring competencies they seek for their students:
- Basic: Understand web authoring terminology, how to use templates, and district policies on copyright, ethics, privacy, and security
- Intermediate: Identify, prepare, create, and upload materials to a web publishing platform
- Advanced: Understand and be able to use CSS code, Flash video, downloads, forms, and databases
EdTech is transforming K-12 learning with an intensity and at a pace that is disruptive, creative, and unpredictable.
Students are no longer content to be passive recipients of information. Few kids can sit behind a desk when they have smart phones or iPads in their possession.
The higher education business model is threatened by the need for cheaper delivery of services, content, and learning.
Pricing, Access, Connectivity, Competition – It’s all about Economics.
“EdTech – Revolution in Education” from the Alliance for Science & Technology Research in America
Actually, what we’re talking about here is the FUTURE of education. Every other industry in the world has seen a radical technological reformation and evolution. Education is now also beginning a radical change in the way school and learning happens, but where will our place be in this period of transition and change?
I think the main reason that more people don’t get more involved with EdTech is FEAR. They are afraid of the unknown, afraid of learning (difficult) new things, or afraid of being left behind.
But, I want to alleviate your fears a bit and argue that WordPress is a (comparatively) easy solution for beginning to get more of your own classes online.
Step 1B: Why WordPress?
define:WordPress/
The #1 web publishing CMS (Content Management System) in the world – powering 23% of all the world’s websites.
FREE. unlimited. awesomeness.
But what about some of the other LMS’s you may already be familiar with?
- Moodle
- Edmodo
- Blackboard
- Desire2Learn (D2L)
- Canvas
- Schoology
I think there are at least 6 primary considerations to keep in mind when choosing a suitable LMS. Each of the above is excellent in some of these aspects, but only WordPress rocks all of them:
- Price
- Power
- Flexibility
- Simplicity
- Support
- Reliability
1: Price
WordPress is “forever FREE” due to the GNU GPL2 license.
2: Power
There are over:
- 3,000 FREE Themes
- 4,000 Premium Themes
- 35,000 FREE Plugins
available for WordPress. How much more power do you need?
3: Flexibility
Thanks to WordPress Multisite (a nifty optional feature in the WordPress core), the software is infinitely scalable. A couple of good examples of this are:
- WordPress.com that serves up over 500 million sites using only ONE code base
- Best Buy which uses ONE base installation to power their 1000s of store sites
- The New York Times, Forbes, and Reuters blogs which are all Multisite installations
4: Simplicity
WordPress is not “easy” as in “post-on-Facebook-easy” but compared to the many other options out there, it is surprisingly easy. I’ve even transferred clients to WordPress from Joomla and Moodle after spending significant time with them in the backend trying to fix things how they wanted.
The WordPress Post editor closely resembles a Microsoft Word document editor and is just as easy to publish with.
If you can Word, then you can WordPress.
In fact, in a 2014 survey of WordPress users around the world, the company found out that 91% of WordPress sites took less than 4-5 weeks to make. This is comparatively easy! And I have experience putting together basic sites with all the elements in only ONE week or less.
5: Support
WordPress already powers 1 in 5 sites you visit on the web, and it’s still growing.
- 2014 was the first year that non-English downloads surpassed English downloads
- There are 17 posts published EVERY SECOND on WordPress.com
- Many of the major corporate, political, and tech brands use WordPress
- The WordPress Community is enormous, friendly, and helpful. There are:
- WordPress Support forums
- WordPress Meetups to provide training and assistance (like our Jeonju Meetup)
- WordCamps for networking and education
- WordPress.tv that contains filmed WordCamp presentations
6. Reliability
WordPress.com gets roughly the same number of monthly unique visitors that Facebook.com gets so up-time and security are big deals. The WordPress.com development team pushes updated code to the core between 60-80 times PER DAY, so both of those facts should give you a feel for just how reliable this service and software are.
If you choose to go self-hosted, however, all that depends primarily on your web host. But the following is a list of some of the top hosts in the world:
- Dreamhost (*affiliate) – get 2 months FREE hosting with the code: WPMUJJ
- Bluehost
- Host Gator
- GoDaddy
- WPEngine
Step 2A: How does an LMS work and how can we use it?
define:Blended Learning/
Education that integrates online and in-person delivery with some element of student control over the time and place in which they access the course content.
Face-to-face interaction + Computer-mediated activities
Consider the following types of classrooms:
- Traditional
- Flipped (Blended) classrooom
- MOOC
What’s an MOOC?
define:MOOC/
Massive Online Open Courses: an online course aimed at unlimited participation and open access via the web.
Examples of MOOCs include:
- edX
- Khan Academy
- Udacity
- Udemy
- Coursera
I’m NOT an advocate for a strictly MOOC-style LMS. These systems conduct courses primarily online with minimal teacher-student interaction except via the forums. Granted, some teachers are very participatory in the forums, but not all are – and online forums still leave something to be desired compared to the traditional model of in-class, face-to-face, teacher-student and student-student interaction.
Besides that, MOOCs are COMPLICATED to implement, especially without a dedicated team behind them.
I feel that, at least as far as online course websites are concerned:
Simplicity is the Ultimate Sophistication.
Leonardo da Vinci
Therefore, when considering the following options for course website preparation, I’d recommend:
- Level of Instruction: prepare a SINGLE course (at least a first)
- Time (Schedule): allow a modified time schedule for students to access the site
- Role of Online Components: enhanced
- Teacher role: Teacher supports
- Student role: Teacher-guided learning
- Student support: School mentoring
- Student to Teacher ratio: 2-3x Traditional
But, for simplicity’s sake, here are the TWO MOST PRACTICAL ways you can implement an LMS website in your classroom:
- Go paperless
- Make homework include online interaction
Step 2B: How can we use WordPress to create an LMS?
There are TWO options for using WordPress to create an LMS:
- WordPress.com
- WordPress.org
WORDPRESS.COM
- Is a hosting SERVICE where you can get a FREE site and username at their domain (http://yourname.wordpress.com)
- Is limited in freedoms, but provides paid upgrades and is still a viable option for class websites
WORDPRESS.ORG
- Hosts the (downloadable) SOFTWARE and all documentation, but you are required to find your own self-hosting solution (http://www.yourname.com)
- Is virtually unlimited in customization options
If you go self-hosted, many of the top hosting providers offer a “One-Click Install” from the CPanel (Control Panel) of their site. It’s a simple matter of point-click-wait-5-minutes and you’ll have the FULL WordPress software up and running on your domain.
Here’s a list of recommended hosting providers again:
- Dreamhost (*affiliate) – get 2 months FREE hosting with the code: WPMUJJ
- Bluehost
- Host Gator
- GoDaddy
- WPEngine
Step 3: What are the specific steps we can take to create an LMS in WordPress?
Consider the 6 aspects of the learning process again:
- Communicate objects (syllabus, course objectives, handouts, etc)
- Learning timelines (class schedule)
- Delivery of materials (drip content)
- Assessment & Tracking of student data
- Communication with students
- Ongoing Resources
In WordPress, you will only need to understand (a minimum of) 5 key concepts to be able to effectively communicate the above 6 aspects to your students. They are:

- Pages
- Posts
- Categories
- Tags
- Media
1. Pages

Pages are hierarchical, “stand alone” articles on your site. Though they have publication dates (and can be scheduled for automatic future publication), they do not “flow” as a blog would. Pages are not inherently “related” to each other and they ARE NOT categorized by Categories nor Tags (more later).
If you want a Page to have some kind of relation to another Page, you must assign it a “Parent” in the Page Attributes widget in the Page editor.
Pages will therefore act like individual menu items (they will be automatically added to your main menu if you don’t create one manually) – and “Parent” Pages will act as the top-level dropdown menu containing any “Child” Pages beneath them.
Pages may also utilize “templates”. These will give your Pages a different output on the front of the website and may look like any of the following:
- Home page
- Landing page
- Contact page
- Clients page
- About page
- Full-Width page
- And so on
2. Posts

Posts are chronological (non-hierarchical) articles that “flow” along the Blog page, Home page, or Archive pages as they are written and published.
Posts are grouped together by Categories (that act like “buckets” or Folders), and Tags (keywords that are used to Search the site).
Posts may also utilize “Formats” that style certain Post types differently. For example, you may have different styles for:
- Regular (Standard) Posts
- Aside Posts (without a title visible on the Blog archive Page)
- Image Posts
- Video Posts
- Quotation Posts
- Link Posts
- Gallery Posts
- Status Update Posts
- Audio Posts
- Chat Posts
3. Categories

On the front-end of a site, Categories may be visible as Folder names for Month or Topic, or in the Breadcrumbs (the “You Are Here” collection of links at the top of a Post), or as individual Menu items.
(On the front-end, you won’t really be able to SEE the difference between Categories and Pages as they appear in the menu unless you click on the link. If it’s a Category, there will be a long list of Posts; if it’s a Page, there will be only ONE Page.)
With Categories, I usually assign each of my Classes to a separate Category. That way, when the students click on the Category name, they are taken directly to an ongoing blog list of ONLY Posts for their class.
4. Tags

On the front-end of a site, Tags may be visible in a “Tag Cloud” (a collection of frequently used keywords throughout the site), or in the footer meta (a collection of data at the bottom) of a Post. You can also Search for Tags as these are WordPress’s “keywords.”
With Tags, I usually add the keywords for the lesson subject – such as a grammar point we’re studying or the key concepts to understand.
5. Media
WordPress Media is unique in TWO primary ways:
- You can Drag-&-Drop media from your Desktop directly into the Post editor window to upload files.

- You can Copy-Paste URLs from popular websites like YouTube and Twitter to get immediate, automatic embeds of those videos and tweets (among other things). No more copying over embed codes!

The WordPress editor also provides you with a view of what your Post will ACTUALLY look like on the front-end even as you type it and before publishing it.
Step 3B: Plugins add Power

The above 5 functions are available both on WordPress.com and with the WordPress.org software. However, if you REALLY want to power-up your LMS, going self-hosted and installing your own plugins is the best way to go.
The following lists provide (at least) FOUR plugin options for EACH of the 6 aspects of learning previously discussed:
1. Communicate Objects
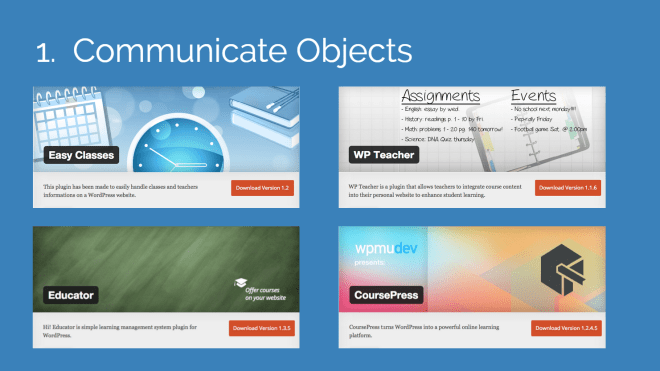
- WPMU CoursePress
- WP Teacher
- Educator
- Easy Classes
2. Learning Timelines

- The Events Calendar
- Weekly Class Schedule
- My Calendar
- Booking Calendar
3. Delivery (Drip Content)

- WP-Members
- Simple Course Creator
- Table of Contents Plus
- Show/Hide Content at Set Time
4. Assess & Track

- AN_Gradebook
- Quiz Tool Lite
- Easy Quiz Player
- BadgeOS LearnDash Add-on
5. Communicate with Students

- Disqus Comment System
- Akismet Spam Comment Blocker
- bbPress Forums
- BuddyPress Social Network
6. Ongoing Resources

- Enhanced Media Library
- BackWPup
- Google Drive WP Media
- Google Drive Embedder
Full-fledged LMS systems for WordPress
- LearnDash
- Woo Sensei
- WP Courseware
- Lifter LMS
- Namaste! LMS (Free)
So, how will YOU use WordPress in your classroom? (or business)?


